Importing Projects from SAS Forecast Server
- Importing a Single FAR File
- Creating Multiple Project Archives from SAS Forecast Studio
- Batch Import of Project Archives from SAS Forecast Server
- Importing a Single Project Archive from SAS Forecast Server
- Viewing the Migration Report
SAS Model Studio users can import SAS Forecast Server projects for use in SAS Viya 4.
- Individual projects can be exported to the FAR filean archive file that has been exported from a SAS Forecast Server project. The file contains the data definitions, properties, events, and other resources needed to run the project in another environment. The other environment could be a SAS Forecast Server or a SAS Visual Forecasting deployment. format using SAS Forecast Project Manager. You can import these projects using SAS Model Studio, as described in Importing a Single FAR File. If the project includes models from an external catalog, you must use the SAS Content Assessment CLI to include those projects in the imported project.
- If you have a large volume of projects to
export, consider using the SAS Content Assessment tool to export the projects from
SAS Forecast
Server.
- Use the SAS Content Assessment tool to package the FAR files to the /assessment/FARPackages directory where the SAS Content Assessment resources are extracted. You must download the latest SAS Content Assessment package for this task. See Creating Multiple Project Archives from SAS Forecast Studio for complete instructions.
- Use the SAS Content Assessment tool and the SAS Viya command-line interface (CLI) to import the FAR files into the SAS Viya platform. You must download the SAS Viya CLI for this task. See Batch Import of Project Archives from SAS Forecast Server for complete instructions.
- You can also use the SAS Viya CLI to import individual FAR files from the /assessment/FARPackages directory in SAS Content Assessment. See Importing a Single Project Archive from SAS Forecast Server for more information.
- After SAS Forecast Server projects are imported, a migration report is available from the Projects page in SAS Model Studio. For more information, see Viewing the Migration Report.
- SAS Visual Forecasting does not support projects with multiple dependent variables. If the SAS Forecast Server project has more than one dependent variable, the import fails.
- Events, filtersa set of specified criteria that are applied to data in order to identify the subset
of data for a subsequent operation, such as continued processing. , custom models, and overrides are imported with the project.
Note:
- When importing a project that contains a custom eventan incident that disrupts the normal flow of any process that generates the time series.
Examples of events are holidays, retail promotions, and natural disasters. that uses the same name as any of the predefined events,
the event is treated as described in the following example.
A project in SAS Forecast Studio has a custom event with the name EASTER, which is the name of a predefined event. The forecaster imports the project to SAS Visual Forecasting. The project is imported successfully with the custom event EASTER. The forecaster opens the Migration Report and sees all of the custom events were imported.

The forecaster opens the project and examines the events on the Data tab. The imported events are listed in the imported table. For the predefined events, EASTER is missing.
If the forecaster wants to include the predefined event EASTER, a custom event must be defined as described in Creating Events for a SAS Visual Forecasting Project.
-
- In the New Event window, for Name, the forecaster must provide a unique name for this event, for example, EASTER1.
- For
Occurrences, the
forecaster must click
 to open the Select
Occurrences window.
to open the Select
Occurrences window. - For Holidays, the forecaster must select the event label that matches the predefined event. In this case, it is Easter Day.
- The
forecaster must click
 to add the event.
 - The forecaster clicks OK to return to the New Event window, and OK to add the event and close the New Event window.
The new custom event with Easter Day can be used in the project.
-
- If the project includes custom models with events that are marked Do not use, those models are not included in the Hierarchical Forecasting (Migrated) node.
- Any model rejected by SAS Forecast Server is not included in the Hierarchical Forecasting (Migrated) node.
- When importing a project that contains a custom eventan incident that disrupts the normal flow of any process that generates the time series.
Examples of events are holidays, retail promotions, and natural disasters. that uses the same name as any of the predefined events,
the event is treated as described in the following example.
- Scenario analyses are not supported in this release of SAS Visual Forecasting and are not imported.
- Projects with custom intervals cannot be imported at this time.
- For the independent variable, these values are not supported for hierarchy
aggregationthe process of combining more than one time series to form a single series
within the same time interval. For example, data can be combined into a total or an
average.:
First value,Last value,Median of values,Total number of values. - Filters based on a continuous range of numeric values that use comparison operators (>, >=, <, or <=) might not resolve exactly after import. This can occur when the comparison is open ended (for example, MAPE < 2400) with no minimum or maximum value specified. The minimum and maximum value is not available during import but after the node is run in the pipeline. After the node is run, the filter is created based on actual data. However, you might want to examine the range of the filter after running a pipeline and make any adjustments that might be necessary.
- The data set for the project must contain a variable that is in a SAS date or datetime format. For more information, see Requirements for Time Series Data.
- FAR files from SAS Forecast Studio contain
the data source that can be used for the project during and after migration.
When you import a single FAR file from the SAS
Model Studio
Project page, you can choose to use a data source that is already present
on the SAS Viya platform. If you do not select an existing data source,
the data in the FAR file is used.
If you choose to use the data source in the FAR file during migration, a unique suffix is appended to the name of the data source for the project that is being migrated. It is common for multiple projects to share the same data source. This makes it possible to have multiple copies of the original data source. This duplication of project data is likely to occur when batch importing multiple projects.
If projects are using multiple copies of the same data source, you can set the projects to use a single data source. You can then remove the duplicate data sets to reduce the impact to memory on the CAS server. For more information, see Replacing the Source Data Set for a Project.
- It is possible to import two projects that share the same name. For information about how this is handled, see Migrating SAS Forecast Server Projects That Share the Same Name .
- Projects that are imported from
SAS Forecast
Server are indicated with this icon:
 . Click
  to open the migration report.
After a project has been migrated, a pipeline is created with a Hierarchical Forecasting (Migrated) node. This node also displays
to indicate that it represents the migrated SAS Forecast Server
project.
Importing a Single FAR File
These steps are for importing archive projects that have been exported using SAS Forecast Project Manager.
- From the
Projects page in SAS
Model Studio, click the menu icon () over the right side of the project list and select Import
 Forecasting.
The Import Forecasting Project window is displayed.
- For the File (zip or far) field, click Browse to provide the file name of the project archive (FAR file) from SAS Forecast Server to be uploaded.
- Choose between the following
options.
- For the Data field, click Browse to provide the location on the target server where the source data for the project is located.
- If you do not select a data source for the project, the source data is imported from the FAR file. The input data from the FAR file is the accumulated time seriesan aggregation of transactional data into specified time intervals and sorted according to unique combinations of the default attributes (BY variables) data from the project archive and not the data that was used for original project creation.
- For the Library field, click Browse to specify the caslib where you want to import the input data set from the project archive. If you do not specify a caslib, the default caslib that is displayed is used.
- For Location,
the folder that was most recently selected is shown, or My
Folder if a folder has never been selected. The drop-down list
includes My Folder and up to five of the most recently
selected folders, if any.
You have two options.
- Choose the current selection or one of the drop-down options for storing the project.
- Click
Browse. The Choose a
Location window opens for you to choose a different
folder to store the project.
To create a new folder, select
My Folderon the left and then click in the upper right corner.
 Select the folder to store the project and click OK to return to the Import Forecasting Project window.
Note: Many of the folders listed on the left side of the Choose a Location window can be selected but should be avoided. Selecting these folders makes the project visible to other users but does not grant access to all resources used within the project to the other users. This can unintentionally make the project available for other users. It can also lead to errors encountered when other users open and attempt to edit your project. For best results, use eitherMy Folderor a folder that you or your system administrator has created for your use.
- Click Import
to complete the process. The following message is displayed.
The import process has started. You will be notified when the import is complete. - When the import is completed, the project appears in the project page. Before you open the project, follow the instructions in Viewing the Migration Report to learn the details about the migration.
- After reviewing the migration report, open the project.
- In the right pane, review the settings
for the dependent and independent variables and make any adjustments as
needed.
When importing projects from SAS Forecast Server, the following hierarchy aggregation and time accumulationeither of two processes that are used to convert a time series. (1) Accumulation converts a time series that has no fixed interval into a time series that does have a fixed interval (such as hourly or monthly). (2) Accumulation converts a time series that has a fixed interval into a time series with a lower frequency time interval (such as hourly into daily). Accumulation combines data within the same time interval into a summary value for that time period. values are not supported. The imported project sets these values to
Sum of values.- Median
- First Occurrence
- Last Occurrence
- Number of Observations
- None
- Run the pipeline for the project.
If you have imported any overrides, they must be resubmitted after the pipeline completes.
See Also
Creating Multiple Project Archives from SAS Forecast Studio
If you have many projects that need to be imported
from SAS Forecast Studio to SAS Visual Forecasting, use SAS Content Assessment to export all of the projects to the FAR file format. This application must be run by the account that was used to install
and configure SAS software (Installer user account) on the SAS 9.4 system. For
more information about this package, see Understanding Content Assessment in SAS Content Assessment.
After you have downloaded and extracted the latest SAS Content Assessment to the SAS 9.4 system, you can use these general steps to export all of the SAS Forecast Server projects.
- In the /assessment directory where the SAS Content Assessment is extracted, edit the setenv.yaml file and specify the SASHome path.
- Edit the metaparms.sas file and specify the SAS Metadata Server connection details and encryption password.
- Run the following command
to generate the contentToBeProfiled.yaml file.
.\profileContent.exe --generate-content-listThe contentToBeProfiled.yaml file lists each type of SAS object to be profiled. For more information about the profileContent command, see Executing the Profile Application in SAS Content Assessment.
- You can edit the contentToBeProfiled.yaml
file to remove any SAS objects that you do not want to be profiled.
Make sure that
Forecast Server Projectsremains in the file when you save it. - Run the following command.
.\profileContent.exe --use-content-listAll of the SAS objects are saved to the /assessment/datamart/profile/metadatalabel_value directory. The SAS Forecast Server projects are located in fs_projects.sas7bdat.
Note: This command can be run multiple times for different deployments identified by the METADATALABEL in metaparms.sas. The METADATALABEL value is used as a directory name in the output path.See metaparms.sas in SAS Content Assessment for more information.
- Run the following command.
.\publishAssessedContent.exe --datamart-type profileThis aggregates and publishes your data marts. Publishing is a required process for all SAS Content Assessment actions. Resulting data sets are tagged to indicate what deployment they are associated with.
For more information about the publishAssessedContent command, see Executing the Publish Application in SAS Content Assessment.
- Use a browser to log in to the SAS Viya 4 platform.
- Click
 in the upper left corner and select Manage
Environment. This opens SAS Environment Manager.
in the upper left corner and select Manage
Environment. This opens SAS Environment Manager. - Click
 in the left column and import the fs_projects.sas7bdat file from the
/assessment/datamart/profile folder. For more information,
see Making Data Available to CAS in SAS Data Explorer: User's Guide.
in the left column and import the fs_projects.sas7bdat file from the
/assessment/datamart/profile folder. For more information,
see Making Data Available to CAS in SAS Data Explorer: User's Guide. - Click
 in the left column and import the
SAS_9_CA_Profile_for_SAS_Forecast_Server.json file from the
/assessment/packages/profile/ folder. The content is
imported to the Public folder by default. See Import Page in SAS Environment Manager: User's Guide for more
information.
in the left column and import the
SAS_9_CA_Profile_for_SAS_Forecast_Server.json file from the
/assessment/packages/profile/ folder. The content is
imported to the Public folder by default. See Import Page in SAS Environment Manager: User's Guide for more
information. - Open the report in SAS Visual Analytics and select the Projects tab. The SAS Forecast Server projects are listed.
- Select the projects that you want to export from the filters on the left.
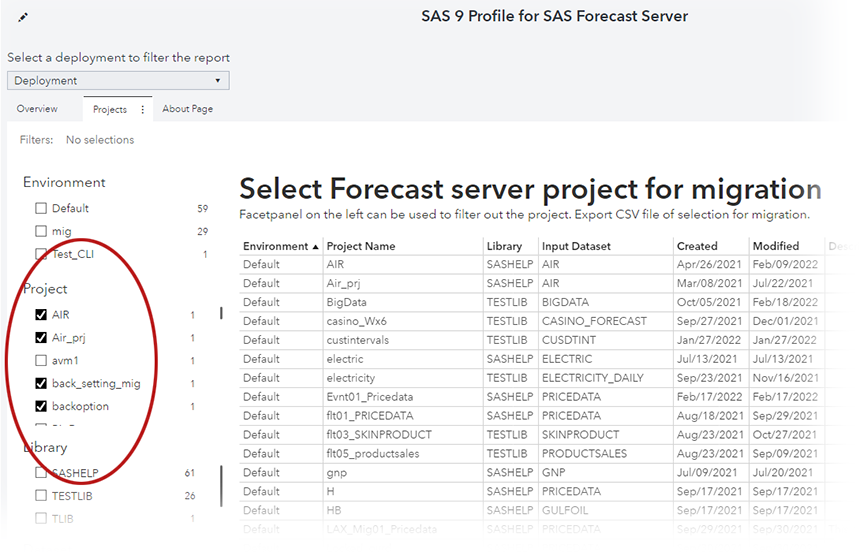
- Click and select ExportData.
The Export Data window is displayed.
- For File type, select Comma separated values (*csv). Leave all of the columns selected and make sure Detailed data is not selected.
- Click Export. You are prompted to specify the location on the local drive and the name of the CSV file to be saved.
- Edit metaparms.sas file
and change the user to the
Forecast Server: Administratoraccount. - Run the following command,
specifying the location and name of the CSV file.
.\createFARPackages.exe --source-file filename.csv.Note: This command cannot be run if any of the other content assessment commands are processing.
The FAR files are created and saved to /assessment/FARPackages.
/assessment/FARPackages/Production/DefaultSubsequent runs of the createFARPackages command delete any FAR files that might have been previously created.
See Also
-
Executing the Create FAR Packages Application in SAS Content Assessment
Batch Import of Project Archives from SAS Forecast Server
The SAS Viya platform provides a command-line interface (CLI) to batch import all of the projects that you have exported from SAS Forecast Server,
To perform this task, you need to download and extract the SAS Content Assessment tool and the SAS Viya CLI. The SAS Viya CLI used in these steps is supported only for Windows and Linux.
Before you start this task, you need to determine the location of the trusted certificate. Contact the SAS administrator if you need any assistance. For more information about the trusted certificate, see Provide the Path to Your Bundle of Trusted CA Certificates in SAS Viya Platform: Using the Command-Line Interface.
After you have followed the steps in Creating Multiple Project Archives from SAS Forecast Studio, you can import all of the projects to the SAS Viya platform using these instructions.
- Navigate to the directory where the
SAS Viya CLI is extracted and install the visual-forecasting
plug-in.
sas-viya.exe plugins install --repo SAS visual-forecasting - In the
/migration directory where the SAS Content
Assessment is extracted, issue this command:
importFARPackages.exe --create-profile --sas-viya-path path_to_sas-viya.exe--source-location ../assessment/FARPackages--destination-caslib MyCaslib--destination-cas-server cas-shared-defaultThe
--source-locationargument is required to specify the location of the project archives exported from SAS Forecast Server, after following the steps in Creating Multiple Project Archives from SAS Forecast Studio.As an alternative, you can specify a CSV file for the source location. The CSV file must contain the source location of the project archives and optional values for the destination caslib and CAS server. The CSV file has a three-column format. The column names are case insensitive and are shown in the first line in this example.
location,caslib,CAS server
..\migration\far-files\Multiple_CityDay.far,Public,cas-shared-default
..\migration\far-files\Sales.far,MyCaslib,cas-shared-default
..\migration\far-files\PriceData_Shared.far,MyCaslib,cas-shared-default
The CSV can be used when you need to import multiple FAR files in batch but specify different caslibs and CAS servers for the input data set for each project. The example above shows how to import three FAR files, two of them using a separate caslib (MyCaslib). The input data set for all three projects are set to use the same CAS server.
The optional arguments are described below. The values for these arguments are used if they are not specified in the CSV. If a different value is specified in the CSV, then that value overrides the specification from the command line.
--destination-caslib-
optional argument that specifies the destination caslib for the input data set to if you do not want it to be saved in the default caslib.
--destination-cas-server-
optional argument that specifies the destination CAS server for the input data set if you do not want it to be saved to the default server.
After this command is issued, a series of messages follow that detail the processing of this command.
- When prompted to
Enter the Service Endpoint:, enter the endpoint name for your deployment for the SAS Viya platform, for example:https://production.example.comYou are prompted to enter the fully qualified path to the trusted certificate for the deployment.
- When prompted, enter the fully qualified path to the trusted certificate for the deployment.
- When prompted to enter the credentials
for this host, enter the user ID and password for your deployment of the
SAS
Viya platform.
The remaining messages indicate the number of FAR files that are being imported and lists each file individually as they are imported.
Log in to SAS Model Studio to view the projects that have been imported. See Viewing the Migration Report to determine the results of the import for any of these projects.
See Also
Importing a Single Project Archive from SAS Forecast Server
After using SAS Content Assessment to create FAR files to import from SAS Forecast Server, you can selectively import single FAR files rather than importing all of them at once. Use the visual-forecasting plug-in for the SAS Viya CLI to import individual FAR files.
- Navigate to the directory where the SAS Viya CLI is extracted.
- Install the visual-forecasting
plug-in.
sas-viya.exe plugins install --repo SAS visual-forecasting - Create a profile for the environment
that you want to use, for example:
sas-viya.exe profile init --sas-endpoint https://production.example.com --colors-enabled --output jsonFor more information, see Command-Line Interface: Instructions when Downloading the CLI in SAS Viya Platform: Using the Command-Line Interface.
- Run this command to log in to the SAS
Viya CLI.
sas-viya.exe auth login --user username --password password - Run this command to import a single FAR file from the /assessment folder in the SAS
Content Assessment path.
sas-viya.exe visual-forecasting import --file  path_to_FAR_file
     --dc MyCaslib --ds cas-shared-default
These arguments are optional:
-
--dcspecifies the caslib to import the input data set if you do not want it to be saved in the default caslib. --dsspecifies the CAS server to save the input data set to.
-
See Also
Viewing the Migration Report
When the migration of a SAS Forecast Server project is complete, the project tile is displayed on the Projects page in SAS Model Studio. The success of the project migration is shown by these indicators on the project tiles.
- — the project has migrated successfully to SAS Visual Forecasting. There might still be some components that did not migrate. Check
the migration report for more information.
 — The project could not be migrated. You can check the
migration report to determine why the project was not migrated. You might be
able to make changes to the project in SAS Forecast Studio to enable the next
migration to be successful.
— The project could not be migrated. You can check the
migration report to determine why the project was not migrated. You might be
able to make changes to the project in SAS Forecast Studio to enable the next
migration to be successful.
After the import of a project fails, the project shows on the page. If you switch to Table view, the data source for the project is displayed as
-.-.
Follow these steps to open the migration report for a project.
- Navigate to the
Projects page in SAS
Model Studio. Projects that have been migrated from SAS Forecast Server have
this indication on their tile: .
- Right-click the project and select View reportsMigration reports.
This opens the Migration Report window.
- If the migration was partially or completely successful,
the window shows metadata about the project, including
the date on which the project was migrated, the FAR file name, and the user name for the person that migrated
the project.
Note: Notice the Shared with field. If the project was shared in SAS Forecast Studio, it is now labeled
Privatein the report. You need to re-create the permissions for the project. See Sharing Projects for complete instructions.The left side of the window lists the components of the project. Beside each component is one of these status icons:
 — The component was partially migrated.
It is common to see this icon with filters that are skipped. Some filters are skipped because they were created internally by SAS Forecast Server and are not used by SAS Visual Forecasting.
- — The component was not migrated. Select this
component to download the log and collect more details about the
problem.
 — The component was successfully
migrated.
— The component was successfully
migrated.
- If the migration was not successful, the window provides a link to download the log.
- If the migration was partially or completely successful,
the window shows metadata about the project, including
the date on which the project was migrated, the FAR file name, and the user name for the person that migrated
the project.
- Click the tabs to view detailed
information about each component. Use these tools for viewing the migration
logs.
 — Downloads the log for either the component or the
full migration report
— Downloads the log for either the component or the
full migration report — Displays the component log in the window