Creating Events for a SAS Visual Forecasting Project
You can create your own custom eventsan incident that disrupts the normal flow of any process that generates the time series. Examples of events are holidays, retail promotions, and natural disasters. in a project from the Data tab in SAS Model Studio.
- In the left pane under
Events, select Custom events.
The middle pane shows a list of custom events that are already defined. If no custom events have been created, the pane is empty with the message
No events are available. - Click
 in the top toolbar of the middle pane.
The New Event window appears.
- Use the following fields to define the new event.
- Name
-
Provide a unique name for the new event. It must be a valid SAS name as described in Rules for Most SAS Names. After the event is saved, the name cannot be changed.
CAUTION
Certain names are reserved and cannot be used for events. The event name cannot match the dependent variable name or any of the following reserved names.
y _linear_ _quadratic_ _cubic_ _inverse_ _seasonal_ - Label
-
Provide a description of the event. This field is optional.
- Type
-
Specify one of the following event types. Point is the default.
Event Type
Shape of the Event
Description
Point

Temporary change in the magnitude of a time series process. The magnitude returns to the former level immediately after the change.
If Point is selected, Options is defined as
duration=0Level shift

Persistent change in the level of a time series process.
If Level shft is selected, Options is defined as
duration=all.Ramp

A sudden growth or decay in the trend or slope of a time series process. This change in growth could persist or end when the time series reaches a new level.
If Ramp is selected, Options is defined as
slope=growth, duration=all.Temporary change

Temporary change in the magnitude. The magnitude decays to the former level after the change.
If Temporary change is selected, Options is defined as
slope=decay,duration=all.Note: After you enter the event name and specify an occurrence, a plot shows in the window showing the shape and duration of the event. This plot shows an event that uses the Temporary Change type with a recurrence every six months.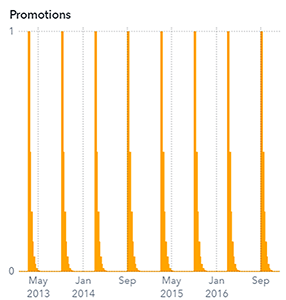
- Click
 to open the Event Options window. Use this window to set the duration of each occurrence of the event.
Event Options - Duration
-
Enter an integer for the number of observations immediately after the occurrence where the event reoccurs.
This field is disabled if Apply to all occurrences is selected.
- Apply to all occurrences
-
Check this to apply the periods to all occurrences of the event. Occurrences are defined later in this process.
- Time of each occurrence
-
Select one of the following.
- On the specified period — The event is set as defined in the occurrence.
- Relative to the specified period — The event is offset by a specified number of observations.
- Direction of the offset
-
Select Earlier or Later to specify the direction of the offset from the occurrence. This field is disabled if Time of each occurrence is set to On the specified period.
- Magnitude of the offset
-
Enter an integer to determine the number of observations to include before or after the event.
This field is disabled if Time of each occurrence is set to On the specified period.
When you are finished defining the duration of the event, click OK to return to the Create Event window.
- Click
 to open the Select Occurrences window. Use the following fields to define occurrences for the date of the
event.
to open the Select Occurrences window. Use the following fields to define occurrences for the date of the
event.
Select Occurrences - Occurrences
-
- Occurrence
-
You can select any time period based on the time interval defined for the project.
- Holidays
-
You can select predefined events as occurrences.
For each occurrence that you select, click
 to add the item to the Selected column. If
you add more than one occurrence or add a holiday as an occurrence, the
Recurrence field on the Create
Event window is disabled.
to add the item to the Selected column. If
you add more than one occurrence or add a holiday as an occurrence, the
Recurrence field on the Create
Event window is disabled.When you have finished defining occurrences, click OK to return to the New Event window. All of the occurrences that you added are listed. You can click
again to add more occurrences.
- To specify the recurrence, click to open the Event Recurrence window.
Note: Before you can specify a recurrence, you must specify an occurrence. However, you cannot specify a recurrence if you have selected two or more occurrences or if you have selected a holiday for the event occurrence.
Event Recurrence - Recurrence
-
- Select how frequently the event will occur — Specify the interval for the frequency of the event. For example, selecting Month specifies a monthly pattern.
- Specify how long the
recurrence will last — Choose one of these options.
- Indefinitely before and after the selected occurrence date
-
The occurrences range from the start date of the historical data to the end date plus three times the horizon.
- Indefinitely starting with and after the selected occurrence date
-
The occurrences range from the date of the specified occurrence to the end date of the historical region.
- For this many occurences, starting with the selected occurrence date
-
The occurrences range from the date of the specified occurrence date and end on the date of either of the following, whichever comes first.
- The number of occurrences that you specify
- The maximum range of the data
- Until this date, starting with the selected occurrence date
-
The occurrences range from the specified occurrence date to the date that you specify for this option, or the maximum range of the data, whichever comes first. This value is a SAS date or datetime value and is not selected based on the detected interval of the time series.
When you are finished defining the recurrence, click OK to return to the New Event window.
- When you are finished defining the event, click OK. The Custom events displays the new event in the middle pane.
- The usage for the custom event is set to Do not use by default. Select the event on the Data tab and use the right pane to change the usage for the new event.
For each custom event, you can perform the following actions.
-
Opens the Edit Event window for a selected event. Only custom events created in the project can be edited. Predefined events and events imported from an event definition table cannot be edited.

-
Opens the Copy Event window with the settings for the selected event. Use this window to create a new event based on the event that you have selected.
In the list of custom events, you can hover your mouse pointer over an event to see its plot.