Working with Modeling Node Templates
- Customizing a Modeling Node
- Downloading Modeling Nodes
- Creating Your Own Modeling Node
- Uploading Modeling Nodes
You can customize many modeling nodes and save them as templates in The Exchange. If you are familiar with SAS code for SAS Visual Forecasting, you can create your own modeling node templates and upload them to The Exchange. Pluggable modeling nodes provide a code editor for you to customize the node to meet the specific requirements of your projects.
Customizing a Modeling Node
Use the Options pane on the Pipelines tab to customize the settings for a selected modeling node in your pipeline. If the modeling node is a pluggable modela modeling node in SAS Model Studio that contains code that can be edited and saved by the user., you can open the code editor to make changes.
- Code editor
-
Click Open code editor to view and change the code for this node. The code editor is available only for pluggable models. See Modeling Nodes Provided by SAS Visual Forecasting to determine which modeling nodes are pluggable.
There is a list of macros on the left side of the code editor. To add a macro, right-click it and select Add to code editor.
Use SAS Visual Forecasting: Programming Guide as a reference when you are working with this code.
The changes that you make to the modeling node affect only the current pipeline.
Click  to save the modeling node to The Exchange. This makes the modeling node
available to be selected in other pipelines and projects, or to be downloaded for
use in other
deployments of SAS Visual Forecasting.
to save the modeling node to The Exchange. This makes the modeling node
available to be selected in other pipelines and projects, or to be downloaded for
use in other
deployments of SAS Visual Forecasting.
For more information about The Exchange, see Working with SAS Model Studio in SAS Visual Forecasting: Overview.
Event definitions for modeling nodes are not saved to The Exchange.
You can also download a modeling node and make changes to it. When you are finished testing it and it is ready for use, you can upload it to The Exchange for use in project pipelines
Downloading Modeling Nodes
To download a modeling node, follow these steps.
- Go to The Exchange, as described in Working with SAS
Model Studio in SAS Visual Forecasting: Overview.
The types of modeling nodes are listed on the left under Nodes.
- In the list of nodes, select Forecasting Modeling.
- Select the modeling node that you want to download. You can select multiple modeling nodes to download.
- Click the Download option
from the menu icon (
 ).
).
Each modeling node is downloaded as a ZIP file. The files in the downloaded package are explained in Creating Your Own Modeling Node
Creating Your Own Modeling Node
There are two ways to create your own modeling node. The first way is to write your own using SAS code. The second way is to make changes to an existing modeling node. Either way, you need to download a pluggable modeling node to get the files in the required format. The files are packaged in a ZIP file. After making your changes, package the files back to the ZIP format and upload it. See Modeling Nodes Provided by SAS Visual Forecasting to determine which nodes are pluggable.
Creating or Modifying the Code
The code.sas file contains the SAS code to run the model for the input data. Many of the pluggable modeling nodes run procedures like PROC TSMODEL, PROC REGSELECT, PROC NNET, and PROC CAS.
You can modify the code that was downloaded or you can replace it with SAS code that you have developed. For best results, the SAS code that you write should work using SAS Studio from the same server where you intend to upload the modeling node to SAS Visual Forecasting.
The SAS code must generate the OUTFOR table from the source data. The variables in the OUTFOR table are described in Working with External Forecast Projects. If you download the Auto-forecasting modeling node, you can see from the code that it also generates the OUTSTAT, OUTSELECT, OUTINFORMATION, and OUTMODELINFO tables.
The SAS code that you use to create the modeling node is not limited to the procedures and CAS actions for SAS Visual Forecasting. For more information about a modeling node that uses gradient boosting (PROC GRADBOOST), see the SAS Global Forum 2019 paper Writing a Gradient Boosting Model Node for SAS® Visual Forecasting.
You can use a set of system-defined macro variables and macros in the run-time code to obtain references to the input data, output forecasts, variable roles, and settings from the pipeline. For example, the following code is used in many modeling nodes to generate output tables:
outobj = (
          outfor  = &vf_libOut.."&vf_outFor"n
          outstat = &vf_libOut.."&vf_outStat"n
          outSelect = &vf_libOut.."&vf_outSelect"n
          outmodelinfo = &vf_libOut.."&vf_outModelInfo"n
          )
For a complete list, see System-Defined Macros and Macro Variables.
Creating the Validation Model
The validation.xml contains the validation model for the modeling node. This file is included in the ZIP file only for pluggable models.
The validation model is specified by an XML schema that is validated when you upload the modeling node to The Exchange. The specifications in the validation model define the settings that are displayed in the Options pane when the modeling node is selected in a pipeline.
The XML starts with
the root <validationModel> element
with three subordinate elements.
<validationModel description="description" name="name" revision="number">
    <links/>
    <version>number</version>
    <properties>
    ...
    </properties>
</validationModel>
For the name and description attributes,
these should match the root name and description properties in the template.json file, which is described
in Identifying the Default Settings.
     "name" : "Custom Model Name",
     "description" : "Custom Model description",
For the revision attribute,
enter a number to correspond with different iterations of your modeling node. Use
the
<version/> element to track updates that are more substantial. All of this
information also needs to be included in the
template.json.
The main content of
the validation.xml file is included in the <properties> element.
The properties define the settings that users can change in the Options pane,
based on their knowledge of the data and scope of the project. Each <property> element
includes these attributes.
- type
-
the data type for the property.
- boolean — creates a check box. If checked, the value is "true".
- integer — requires integer values with no decimal
- double — requires numerical values that can have decimals
- string —
requires character values. Usually, these values are a limited set
of values that you define in the
<choicelist>element.
- name
-
the name of the macro variable for the property. The value that the user chooses for this property is passed to the macro variable in the code. This value must match the macro variable name used in the code.
For example, in the Naive Model modeling node,
name="_naiveModelType"is the property that passes its user-chosen value to the&_naiveModelTypemacro variable in the code. - required
-
a true or false value that indicates whether a value for this property is required. The default is true.
- selector
-
a true or false value. This should be set to “false” if the property is a Boolean data type.
- id
-
You do not need to provide an ID. The ID is assigned to the property by SAS Visual Forecasting. When a pluggable model is downloaded, it includes this ID for each property.
- description
-
provides more information about the property that is displayed when users hold the mouse pointer over the label
- array
-
a true or false value.
- enabledWhen
-
specifies a condition in which the setting is enabled. The following example from Hierarchical Forecasting (Pluggable) uses a Boolean property that determines whether the Sensitivity level for intermittency test is enabled. If the user unchecks Include IDM models, the value for
_idmIncludebecomes false and this field is disabled.<property type="integer" required="true" selector="false" name="_intermittencySensitivity" displayName="Sensitivity level for intermittency test" array="false" enabledWhen="_idmInclude" enabledWhenValue="false"> ... ... </property>You can specify other conditions.
enabledWhen="_holdoutSampleSize >=1"-
- If
_holdoutSampleSizeis greater than or equal to 1
- If
enabledWhen="_modelSelection_criteria != 'MAPE'"-
- If
_modelSelection_criteriais not equal to the string "MAPE"
- If
enabledWhen="_modelSelection_criteria != 'MAPE' && _esmInclude"-
- If both conditions are
true. If you use the
||operand, then the value is true if either condition is true
- If both conditions are
true. If you use the
enabledWhen="_reconcileLevel == 0"-
- If
_reconcileLevelis equal to 0
- If
Examining the structure of the validation.xml in several pluggable modeling nodes can demonstrate how to define the properties for your modeling node. The following examples explain many of these techniques for each data type.
- numeric data
-
Generally, for properties with a double or integer data type, specify a constraint on the minimum or maximum value. The following code sample shows a typical property definition for a double data type. The property defines the setting for Percentage of data points used in the holdout sample in the Hierarchical Forecasting (Pluggable) node. When the property takes a numerical value, you should include the
<constraints>element and specify any minimum or maximum value on the<range>element.<property type="double" required="false" selector="false" name="_holdoutSamplePercent" displayName="Percentage of data points used in the holdout sample" description="Specifies the maximum percentage of data points used for validation. ... " array="false" enabledWhen="_holdoutSampleSize >=1" enabledWhenValue="false"> <clientProperties> ... ... </clientProperties> <constraints> <range min="0" max="100" includeMin="true" includeMax="false" enabledWhenValue="false"/> </constraints> </property> - boolean
-
Properties of a Boolean data type generate a simple check box. If the box is checked, the value is true. The following shows a typical property definition for a Boolean data type. The property defines the setting for Include IDM models in the Auto-forecasting modeling node.
<property type="boolean" required="false" selector="false" name="_idmInclude" displayName="Include IDM models" array="false" enabledWhenValue="false"> <clientProperties/> <constraints/> </property> - string
-
Like numeric data types, strings require constraints that limit the user’s input to data that the forecasting model can process. The following property, IDM method, uses a
<choicelist>element that specifies the options that the user can select from. ThedisplayValueis what users can select in the drop-down menu and the value is passed to the &_idmMethod macro variable in Auto-forecasting.<property type="string" required="true" selector="false" name="_idmMethod" displayName="IDM method" array="false" enabledWhenValue="false"> <clientProperties/> <constraints> <choicelist enabledWhenValue="false"> <choice value="AVERAGE" displayValue="Average"/> <choice value="BEST" displayValue="Best"/> <choice value="CROSTON" displayValue="Croston"/> </choicelist> </constraints> </property>
Identifying the Default Settings
The template.json file contains the metadata about the node in JSON format, including the name, description, version, and the default values for the settings in the Options pane when the modeling node is selected.
The structure of the template.json file is very rigid and should not be changed. The following values should be changed to match your custom modeling node. The other values should not be changed or removed.
name-
Provide the name as it should appear in The Exchange and in a pipeline.
description-
Provide a brief description. This appears at the top of the Options pane when the modeling node is selected in a pipeline.
revision-
Numerical value indicating the latest revision of the modeling node.
version-
Numerical value indicating the latest version of the modeling node.
prototype-
Here are the only name value pairs in “
prototype” that can be changed.name— Use the same string as the previousnameobject.revision— Use the same number as the previousrevisionobject.componentProperties— These pairs of names and values pairs define the default values for the settings that are defined in the validation.xml file.Here is an example of some of the default values that you can change in Hierarchical Forecasting, along with the settings in the Options pane that are affected. All of these properties are under the block of diagnostic properties.
Default Settings Default definitions compared to Options pane
Diagnostic settings in the Options pane
"diagnostic" : {
  "intermittencyTest" : true,
  "intermittencySensitivity" : 2,
  "seasonalityTest" : false,
  "seasonalitySensitivity" : 0.01,
  "diagnoseIndependentVar" : "NONE",
  "functionalTransformation" : "NONE",
  "functionalTransformationPARM" : 0,
  "functionalTransformationOPT" : "MEDIAN",
  "minobs" : 2,
  "minobsTrend" : 2,
  "minobsSeason" : 2
},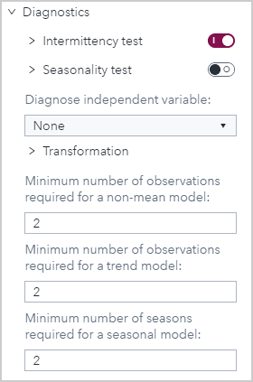
To check for seasonality in this example, change
seasonalityTestto “true”. If you changefunctionalTransformationto “AUTOMATIC”, you can also change the value offunctionalTransformationOPTto “MEAN”, or you can leave it to the original value “MEDIAN”.
Providing Version Information
The metadata.json file defines the version of SAS Visual Forecasting that can support the modeling node. After downloading the modeling node, do not make any changes to this file.
Uploading Modeling Nodes
The modeling node must be packaged in a ZIP file. The contents must include the same files that the download package includes (code.sas, validation.xml, metadata.json, and template.json) in the root directory.
If the modeling node has the same name as a modeling node that is already installed to The Exchange, the name of the uploaded modeling node is appended with a number in parentheses. If you want to replace a modeling node on the Exchange, it must be removed first before you upload the new modeling node.
To upload a modeling node, go to The Exchange and click the Upload option. When the upload operation is complete, the time stamp is displayed by the modeling node.
For more information about using The Exchange, see The Exchange in SAS Visual Forecasting: Overview.